 Nask AI

Key takeaways
- A stage list is a design, not a form to fill in: one stage for every step you would act on, each with a way to confirm it.
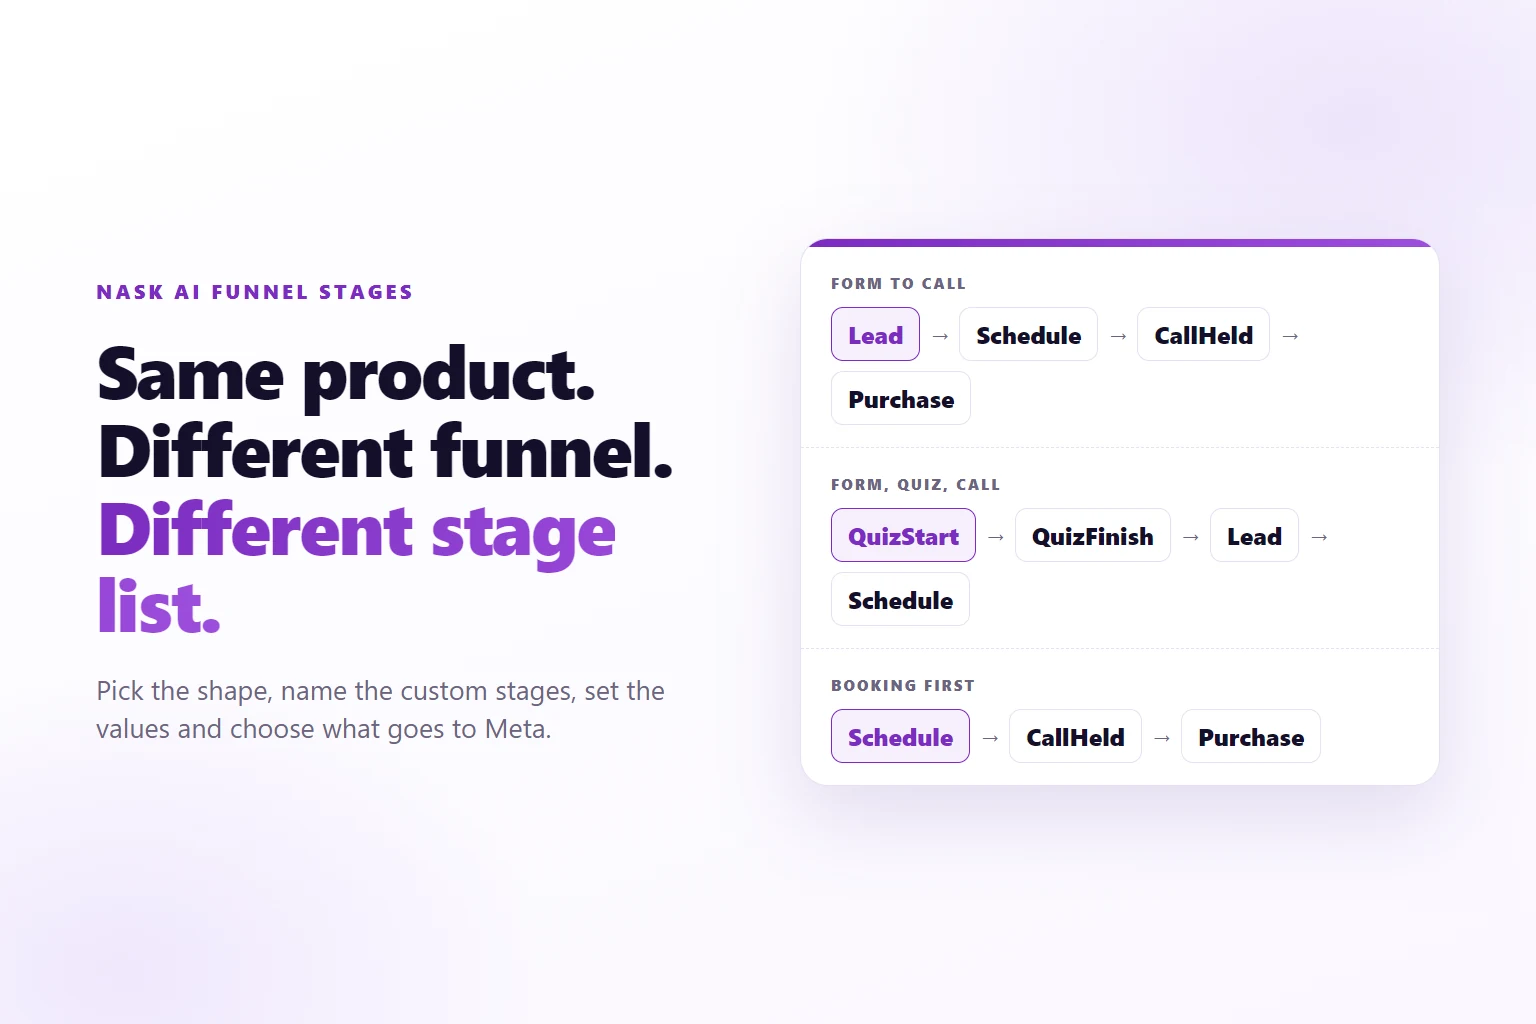
- The funnel shape decides the first stage. Form to call, form to quiz to call, and booking first start from different places.
- A custom stage reaches Meta under its own name and counts in reports as one of seven standard names, chosen for what the step means.
- Value, Predicted LTV and Send to Meta are saved once per stage name for the whole brand, so two funnels sharing a name share the numbers.
- Send to Meta decides what leaves Nask AI, and a stage switched off still shows in your reports.
A funnel stage in Nask AI is one step a visitor takes after the click, such as a lead, a booked call or a sale. Each stage has a name, the standard name it counts as in reports, a way it is detected, an optional value, and a switch for sending it to Meta.
You open 2. Funnels and stages for the first time and the suggestion bar offers Lead. Then Schedule, then CallHeld, then Purchase. That chain fits one kind of funnel. Yours might open with a quiz, or with a booking and no form at all, or you run a webinar and a consultation side by side and need two lists.
The pixel setup guide covers the script (nsk.js), the domains and the live test of each stage that happens on a page. This guide covers the part around it: how to design the list for your funnel shape, and what every setting on a stage does once it is saved.
What you are building
One funnel for each way a visitor enters, and in it an ordered list of stages. Every stage carries the same decisions:
- Its name, and for a custom name, which standard name it counts as in reports.
- How it is detected: a form, a widget, a page visit, a line of your own code, a CRM stage, a payment or a webhook.
- Its Value and Predicted LTV, both optional.
- Whether it is sent to Meta.
Nask AI turns the saved list into the reports you read and into the events it can send to Meta. Sending is handled in the Conversions API section, the card group under Pixel and funnel on the same Growth tab, where Nask AI receives and forwards events. The same list is what tracking leads from Facebook ads to sales asks you to decide, so read that one first if you are unsure which steps deserve a stage.
Step 1: Write the stage list before you open the app
The obvious move is to add a stage for everything that happens. Every stage is one more thing to detect, test, name, value and decide on, and a stage nobody reads is noise in every report that follows.
Keep a step when its count would change something you do: an ad you keep or cut, a follow-up you send, a budget you move. Keep it only if you can name how it is detected. A step with no way to confirm it is a guess, and the list is easier to trust when it holds none.
On paper, write four columns for each step:
- what happens, in plain words;
- the one-word name it will carry;
- how it is detected;
- the page or tool where it happens.
Put the steps in the order a buyer meets them. That order is the order of the list, and the arrows on each row move a stage up or down later if you get it wrong.
Step 2: Pick the funnel shape
In Nask AI, open Brands in the sidebar, pick the brand, open the Growth tab and find Pixel and funnel. In 2. Funnels and stages, type a name in the field that reads “New funnel, e.g. Webinar” and press the plus.
Under the stages sits a suggestion bar. It reads “Suggested next:” followed by a stage, how it is detected and a reason, with a button that reads “Add” and the stage name. The bar works from the last stage in the list, so the order you add stages in steers what it offers.
Form to call
This is the chain the bar builds when you keep accepting it:
- Lead, detected by Form on a page. The bar’s reason: “Most funnels start with a form.”
- Schedule, detected by a Booking or form widget. “A lead usually books a call next.”
- CallHeld, a custom stage that counts as CompleteRegistration, detected by CRM stage (Attio). “The call happened, marked in your CRM.”
- Purchase, detected by Stripe payment. “The sale, paid through Stripe.”
After Purchase the bar has nothing to suggest. If you have no CRM, open CallHeld, change Detected by to Webhook, and let the tool that marks the call post it from the server. Step 6 shows what that post looks like.
Form, quiz, call
While the funnel has no stage named QuizStart, the bar shows Add a quiz step. It adds QuizStart as a custom stage that counts as CompleteRegistration and is detected by Custom code. From there the suggestions run QuizStart, QuizFinish, Lead, Schedule, CallHeld, Purchase.
A Custom code stage needs one line on your page when the step happens. The editor prints it with the stage name filled in:
nsk.track('QuizStart')The editor’s quiz help also lists nsk.track('QuizQuestion3') for each question. Treat that as an option, not a requirement. Nask AI accepts an event only under a name it has a stage for, so a name with no stage comes back Rejected in the live test. A funnel that reads only the start and the finish needs two stages. Add a QuizQuestion stage for a question only when you will act on how many people reach it.
Booking first
No form, no Lead: the visitor lands on a page and books. The empty funnel still suggests Lead, so ignore the bar and click Add a stage. Open the Stage picker and choose Schedule. Detected by switches to Booking or form widget, and the editor asks for the Widget (Cal.com, Calendly, GoHighLevel, HubSpot, Jotform or Typeform) and the Page URL. The pixel setup guide lists which widgets nsk.js hears a finished booking from.
Once Schedule is saved, the bar offers CallHeld and then Purchase. Nothing requires a Lead stage before a Schedule, and the report’s goal, covered below, starts on booked calls anyway.
Step 3: Split into funnels only when the stage lists differ
The left column of the card lists your funnels. Add a second one when the entry point and the steps really differ, such as a webinar that runs registration, attendance and call against a consultation form that runs form and call. Two entry points with the same steps are one funnel.
Here is the trap in a brand with several funnels. Stage settings are saved by stage name, once per brand. Two funnels that both hold a stage named Lead share one row of Value, Predicted LTV and Send to Meta, and the last stage you save sets it for both. The Events and values card in the Conversions API section shows that single Lead row.
A form also reports one name, Lead, unless its data-nsk-stage attribute names another. So when two funnels need different numbers, give the second a custom stage and tag its form:
<form data-nsk-stage="WebinarLead">
  <input type="email" name="email" required>
  <button type="submit">Save my seat</button>
</form>
Create WebinarLead as a custom stage that counts as Lead. It gets its own row, and reports still count it under Lead. Type its Value and Predicted LTV there: a blank one uses the figure on Lead. Removing a stage deletes it from the funnel and keeps its row in Events and values, because another funnel or a server sender may still use the name.
Step 4: Name custom stages and choose what they count as in reports
The Stage picker lists seven standard names: Lead, Schedule, StartTrial, InitiateCheckout, Purchase, Subscribe and CompleteRegistration. Pick Custom name for anything else and two more fields appear: Name and Counts in reports as. A name starts with a letter, runs up to 50 characters, and cannot repeat a standard name or another stage in the same funnel.
A custom stage has two audiences, and the two fields serve them separately.
Meta sees the name. The editor says it plainly: the stage “reaches Meta under its own name, so you can optimize for it as a custom conversion.” Meta receives only letters, digits and underscores, with any other character turned into an underscore, so call it CallHeld, not Call Held.
Your reports see the bucket. Reports and the report’s goal strip read the seven standard names only, so a custom stage lands in the one you picked, which this guide calls its bucket. Choose it by meaning. The suggestions count CallHeld as CompleteRegistration, which is fine until you also count QuizStart and QuizFinish there. Then one bucket holds three different steps, and each person is counted once in it.
That costs nothing until you pick the bucket as a report goal. If you plan to read Registrations, give each stage that should be read apart a different bucket. The list does not offer Cancel and Refund: those are report-only events a server sender can post to adjust reports, and Nask AI never sends them to Meta.
Step 5: Set Value and Predicted LTV
Under the name sit Value and Predicted LTV, with the brand’s currency beside them when one is set. That currency is the Default currency in the Defaults and alerts card of the Conversions API section. Both fields take digits and a dot only, so 1500 or 99.50, never 1,500.
Value is what the step is worth. Predicted LTV is what you expect a customer who reaches it to be worth over their lifetime. Both travel with the event to Meta, under the names value and predicted_ltv. Four rules decide what happens to them:
- The event’s own figure wins. A payment that arrives with an amount keeps its amount. The stage’s number fills in only when the event carries none.
- A Purchase with no value is never sent. Nask AI stores and reports it, and holds it back because Meta rejects a purchase without one. Give the Purchase stage a Value, or make every payment post its amount.
- Money in reports comes from payments. Reports count a Purchase or a Subscribe as money when it carries a paid amount. A Value on Lead or Schedule is the figure sent with that event, not revenue, and the report does not add it to revenue.
- Blank means no figure of its own. A stage with a standard name sends nothing. A custom stage uses the figure on the standard name it counts as, so type a Value if WebinarLead should differ from Lead.
Step 6: Add the server stages
CRM stage (Attio), Stripe payment and Webhook stages happen off your pages, so nsk.js cannot see them. The editor says so: “Sent by the server, no page code needed.” What each one needs from you differs.
For a CRM stage, type the Attio stage title as Attio shows it, for example “Call held”. Stripe payment is a label for where the money comes from, so a Make or Zapier scenario, or any tool that can send a POST request, posts the event to the brand’s endpoint. The Endpoint and secret card in the Conversions API section holds it. Each event needs three fields:
event_id, your own unique id, so a resend is stored once;event_name, the stage’s name, which must match a stage you saved;occurred_at, when it happened, with the year first.
Add at least one identifier too, such as an email or phone, or the event is stored and reported but never sent. An event older than 7 days is held back, with a longer window for Attio stages.
How to send CRM stages to Meta end to end gets its own guide, “Send CRM stages back to Meta”. This guide stops at the stage list.
How to check one. Server stages have no Test button. Post an event, then read the Last 30 days card. Its tiles read Received, Matched, Held and No lead, then Would send in Dry run (nothing is sent, see Step 7) or Sent when live, and last Not sent, or Failed when Meta refused any event.
Step 7: Decide what to Send to Meta
Send to Meta is on by default. Switch it off and the stage shows a Not sent to Meta badge in the list. The stage still counts in Nask AI reports.
A second control sits above every stage. The Sending to Meta card of the Conversions API section reads Dry run or Live. In Dry run, Nask AI matches every conversion and builds the exact event it would send, and sends nothing. The workspace owner clicks Go live, then confirms with Send to Meta. Back to dry run undoes it, and going live sends new conversions only.
For each stage, ask whether you would pay for another one of these. If yes, leave the switch on, because a stage that is switched off never reaches Meta. If it is a diagnostic count, such as QuizQuestion3, switch it off and keep it for reports.
Two details bite. A custom stage that counts as Lead also stays home when the Lead row in Events and values is switched off, because either row off means off. And an event with no lead behind it is not discarded: when Nask AI finds no match or several, the tile reads No lead or Held, and the event goes out with its own details only, provided it carries an identifier of its own.
How the stages show up in reports
Open Analytics in the sidebar. For a brand with Meta connected, the standard report sits at the top, and above its figures is a strip that reads Conversion goal with your current choice beside it. Click it open to see a Primary and a Secondary row, each offering Leads, Registrations, Booked calls, Trials, Checkouts, Purchases, Subscriptions and Off. Those are the seven standard names, so the strip is where your choice of bucket in Step 4 pays off.
With nothing chosen the report is measured on Booked calls, then Purchases. The goal counts people, not events: someone who books twice is one booked call. A window that starts before the brand’s first event of that name shows a dash, never a 0, because nothing was proven absent.
The funnel a stage sits in is how you organize setup. It is not a column in the report. Stages are read by the standard name they count as, which is why Step 4 matters more than the order of the list.
When the list is right, every stage you can detect arrives with the identifiers that tie it to the ad. Once that works, how many ads an ad set needs is the next lever: stages tell Meta what a good lead is, and ads are how it finds more of them.
Hand it to Claude Code
If you would rather start from a draft, an agent can design the table for you. Paste this into Claude Code:
Read https://nask.ai/map-funnel-stages-in-nask-ai and design the Nask AI
stage list for my funnel.

My funnel, in order: <what happens, on which page or in which tool>
My CRM and payment tool: <for example Attio, Stripe, none>
My brand currency: <for example USD>

Do this:
1. Say which funnel shape from the article fits, and why.
2. Give me a table with one row per stage: Stage, Name, Counts in
   reports as, Detected by, Page URL or Page address contains or Attio
   stage title, Value, Predicted LTV, Send to Meta.
3. For each Custom code stage, give the nsk.track('<StageName>') line
   and where in my code it belongs.
4. For each server stage, list the fields its sender must post:
   event_id, event_name, occurred_at and an identifier.
5. Write "ask me" for every number you do not know. Do not guess one.

Do not log in to any tool, do not change my site, do not post any event
and do not touch an ad account. Show me the table and stop at a draft.
Review the table, then create the stages in Nask AI and run the live test from the pixel guide on each one that happens on a page.
When not to do this
If your funnel is one form on one page, you need one stage. Add Lead, test it, and stop.
If a step has no way to be confirmed, leave it out. A lead that stays inside an instant form never reaches Nask AI, so a stage for it would stay empty. Stages here are for steps on your own pages and for server steps you can post. With the stages mapped, the next step is briefing your first ads in Nask AI Studio.
Nask AI keeps the whole funnel in one place: the stage list, the values, the live test and the Conversions API that sends the stages you choose. Book a demo and watch a stage list built for your funnel shape.
Book a demoFrequently Asked Questions
How many stages should a funnel have in Nask AI?
Give a funnel one stage for every step you would act on, and no more. A funnel that is one form on one page needs one stage, Lead. A form, a booked call, a held call and a sale is four. Each extra stage is one more thing to detect, name, value and decide on, so add it only when its count would change a decision.
Can one stage count as more than one thing in reports?
No, a stage counts as exactly one of the seven standard names: Lead, Schedule, StartTrial, InitiateCheckout, Purchase, Subscribe or CompleteRegistration. Several stages can share the same name, and reports then count them together. A custom stage still reaches Meta under its own name, so the two sides can differ.
What happens to Value if two funnels use the same stage name?
They share it. Value, Predicted LTV and Send to Meta are saved once per stage name for the whole brand, so the last stage you save sets them for both funnels. To give two funnels different numbers, name the stages differently, for example Lead and WebinarLead, set WebinarLead to count as Lead, and type its own Value and Predicted LTV, because a blank one inherits the figure on Lead.
Do I have to send every stage to Meta?
No. Send to Meta is a switch on each stage, and a stage switched off shows a Not sent to Meta badge while still appearing in Nask AI reports. Nothing is sent to Meta at all while the brand’s Sending to Meta card reads Dry run, and going live sends new conversions only.
How do I know a server stage works when it has no Test button?
Post one event, then read the Last 30 days card in the Conversions API section. Received should rise by one, and Matched, Held or No lead says what Nask AI did with it. In Dry run the Would send tile counts events built but not sent. A Failed tile means Meta refused something, and it replaces Not sent.